Painting and customizing your micro small sea life figurines can be a delightful and fulfilling project. Not only does it allow you to express your creativity, but it also gives you the opportunity to create unique pieces that hold personal significance. Whether you’re looking to enhance your collection or create a heartfelt gift, this guide will walk you through the entire process of painting and customizing your figurines. Let’s dive in!
Why Customize Sea Life Figurines?
Before we get into the nitty-gritty of painting techniques and materials, let’s explore why customizing your sea life figurines is such a rewarding endeavor.
- Personal Expression: Each figurine can reflect your personality or tell a story. You can choose colors and designs that resonate with you.
- Unique Gifts: A customized piece makes for a thoughtful gift that shows you care. Imagine gifting a friend a painted starfish that symbolizes resilience and hope.
- Therapeutic Activity: Engaging in creative activities like painting can be incredibly therapeutic. It allows you to unwind, focus, and express yourself.
Now that we’ve established the benefits, let’s get into how to paint and customize these charming little creations.
Materials You’ll Need
To get started on your painting journey, gather the following materials:
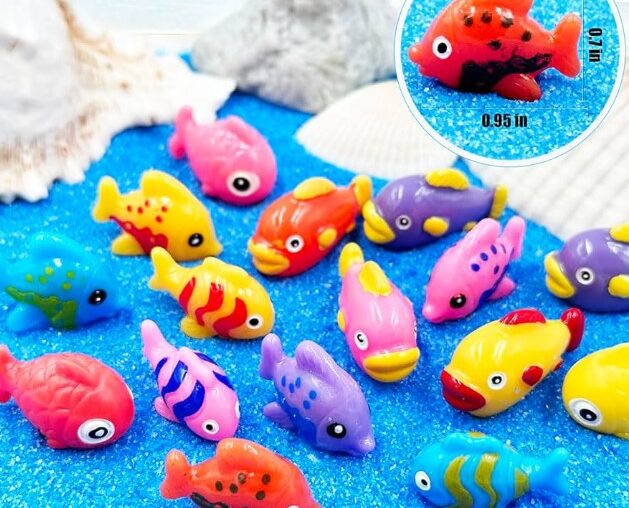
- Micro Small Sea Life Figurines: Choose from various options like micro small sea life figurines such as starfish, seahorses, or shells, all offered by Camp Hollow at a reasonable rate.
- Acrylic Paints: These are ideal for plastic or resin figurines due to their vibrant colors and quick drying time.
- Paintbrushes: A variety of sizes will help you achieve different effects—small brushes for detail work and larger ones for base coats.
- Palette: Use a disposable plate or a traditional artist’s palette for mixing colors.
- Sealant: A clear acrylic sealant will protect your finished piece from wear and tear.
- Water Container: For rinsing brushes between colors.
- Paper Towels: Handy for cleaning brushes and wiping excess paint.
Step-by-Step Guide to Painting Your Figurines
Step 1: Prepare Your Workspace
Find a well-lit area where you can comfortably work. Lay down some newspaper or a drop cloth to protect your surfaces from paint spills. Make sure you have all your materials within reach.
Step 2: Clean Your Figurines
Before painting, give your figurines a good wipe down with soap and water to remove any dust or oils. This ensures that the paint adheres properly.
Step 3: Base Coat
Start by applying a base coat of acrylic paint in your chosen color. This will serve as the foundation for your design. Use larger brushes for this step, applying an even layer across the entire surface of the figurine.
- Tip: If you’re using light colors, consider starting with a white base coat to make the colors pop.
Step 4: Add Details
Once the base coat is dry (which usually takes about 15-30 minutes), it’s time to add details. Use smaller brushes to paint intricate designs, patterns, or highlights. This is where you can really let your creativity shine!
- Techniques to Try:
- Dry Brushing: Lightly dip your brush in paint and wipe most of it off before applying it to create soft highlights.
- Sponging: Use a makeup sponge to dab on color for a textured effect.
- Dotting: A toothpick or the end of a paintbrush can create beautiful dot patterns.
Step 5: Personal Touches
Here’s where customization comes into play! Think about what personal elements you want to add:
- Names or Initials: You could write a name or initials on the figurine using fine-tip paint pens.
- Symbols or Quotes: Consider adding symbols that hold meaning for you—like hearts, stars, or even small quotes that inspire you.
Step 6: Seal Your Work
Once everything is dry and you’re happy with your design, apply a clear acrylic sealant. This will protect your figurine from scratches and fading over time. Follow the instructions on the sealant for best results.
Step 7: Display Your Creation
Now that your masterpiece is complete, find a special place to display it! Whether it’s on a shelf, in an aquarium setup, or as part of a centerpiece, let it shine!
Tips for Customizing Your Figurines
Customization is all about making each piece uniquely yours. Here are some additional tips:
- Color Schemes: Consider using complementary colors that resonate with ocean themes—blues, greens, corals, and sandy neutrals work beautifully together.
- Layering Colors: Don’t be afraid to layer different shades of colors for depth. For example, start with a light blue base and add darker blues along the edges for dimension.
- Incorporate Nature Elements: If you’re feeling adventurous, try incorporating real sand or tiny shells into your design by mixing them into the paint or gluing them onto the figurine.
Caring for Your Painted Figurines
To ensure your painted sea life figurines last:
- Keep Them Dry: Avoid exposing them to water unless they are sealed properly.
- Dust Regularly: Use a soft cloth to keep them clean without scratching the surface.
- Store Safely: If not displayed, store them in a protective box away from direct sunlight.
Conclusion
Painting and customizing micro small sea life figurines is not just an art project; it’s an opportunity to express yourself creatively while creating meaningful pieces that tell your story. Whether you’re making gifts for loved ones or adding unique decor to your home, these figurines can embody resilience, love, and personal significance.So gather those materials and let your imagination run wild! After all, every stroke of paint adds character and charm—just like life itself.
Table of Essential Materials for Painting Figurines
| Material | Purpose |
|---|---|
| Micro Small Figurines | The base items you’ll customize |
| Acrylic Paints | Vibrant colors that adhere well |
| Paintbrushes | Various sizes for detailed work |
| Palette | Mixing colors effectively |
| Sealant | Protects finished pieces from damage |
| Water Container | Rinsing brushes |
| Paper Towels | Cleaning brushes and wiping excess paint |
Table of Painting Techniques
| Technique | Description |
|---|---|
| Dry Brushing | Creates soft highlights by using minimal paint |
| Sponging | Dabbing color on with a sponge for texture |
| Dotting | Using small tools for intricate patterns |
With these tips in hand, you’re ready to embark on an exciting journey of creativity! Happy painting!