Creating your own Jewelry Labels And Tags can be a fun and rewarding process, especially if you’re looking to brand your jewelry line or simply organize your personal collection. This guide will walk you through the steps of designing, printing, and applying your own jewelry labels and tags, covering everything from materials to design tips.
Step 1: Define the Purpose of Your Labels and Tags
Before you start designing, it’s essential to determine the purpose of your jewelry labels and tags. Are they meant for branding your business, providing care instructions, or indicating pricing? This will guide your design choices and the information you include.
- Branding:
If you’re a business owner, your labels should reflect your brand’s identity. Include your logo, brand name, and perhaps a tagline.
- Care Instructions:
Providing care instructions can enhance customer satisfaction and promote the longevity of your jewelry.
- Pricing:
Price tags should be clear and easy to read, with space for pricing information.
Step 2: Choose Your Materials
The materials you choose for your jewelry labels and tags will impact both their look and durability.
- Paper:
Standard paper is easy to print and can be used for temporary tags. Consider using thicker cardstock for a more professional look.
- Vinyl:
Waterproof and durable, vinyl labels can withstand moisture, making them ideal for jewelry that may get wet.
- Fabric:
Woven or printed fabric labels can add a unique touch and are particularly suitable for handmade jewelry.
- Metal:
For high-end pieces, consider engraved metal tags for a luxurious feel.
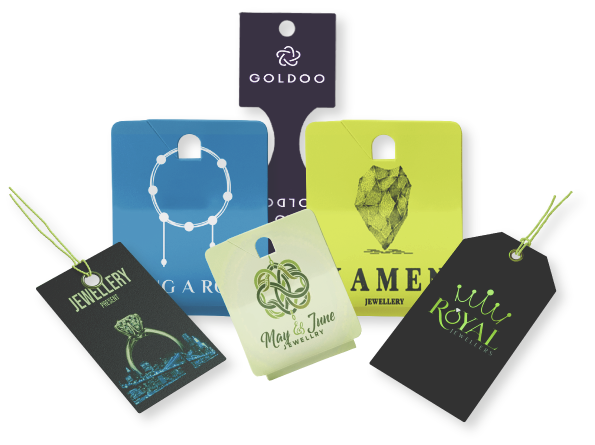
Step 3: Design Your Labels and Tags
Designing your labels can be done using graphic design software or online platforms. Here are some steps to consider:
- Select Dimensions:
Common sizes for jewelry tags include 2×3 inches or 1×2 inches, but you can choose dimensions that suit your design.
- Choose Fonts and Colors:
Stick to fonts that are legible and align with your brand identity. Limit your color palette to maintain a cohesive look.
- Add Essential Information:
Include your brand name, logo, care instructions, and pricing information. Ensure that the text is easy to read.
- Visual Elements:
Consider adding decorative elements such as borders, patterns, or images that relate to your jewelry.
Step 4: Print Your Labels and Tags
Once your design is complete, it’s time to print. Here are some options:
- Home Printing:
If you have a quality printer, you can print your labels at home. Use appropriate paper or vinyl sheets and adjust your printer settings for the best results.
- Professional Printing Services:
For a more polished look, consider using a professional printing service. They can provide a variety of materials and finishes.
- DIY Methods:
You can also explore DIY printing techniques, like using rubber stamps or hand lettering for a personal touch.
Step 5: Cutting and Finishing Touches
After printing, you’ll need to cut your jewelry labels and tags to size. Here are some tips:
- Use a Paper Cutter:
For clean, straight edges, a paper cutter or scissors will work well.
- Corner Rounding:
Consider using a corner rounder punch for a more polished look.
- Finishing Options:
If desired, laminate your tags for added durability, or use hole punches to create holes for string or chains.
Step 6: Attach Your jewelry labels and tags
How you attach your labels will depend on the type of jewelry and the style of the tag.
- String or Ribbon:
For tags that need to hang, use a thin string, twine, or ribbon that compliments your jewelry.
- Adhesive:
For labels that will sit flat, adhesive backing can be effective, especially if the label is small.
- Safety Pins or Clips:
These can be used for temporary tags, allowing you to easily remove them after purchase.
Step 7: Organizing Your Labels
If you’re creating labels for a large collection or inventory, organization is key. Consider:
- Storage Solutions:
Use binders or storage boxes to keep your labels organized by type, size, or theme.
- Inventory System:
If you have many pieces, an inventory system that correlates with your tags can help track your jewelry.
Step 8: Legal Considerations
If you’re selling jewelry, ensure that your labels comply with any local regulations. This may include:
- Material Safety:
If your jewelry contains specific materials, you may need to disclose this information.
- Country of Origin:
Some regions require labeling that indicates where the product was made.
Conclusion
Creating your own jewelry labels and tags is an excellent way to enhance the presentation of your pieces and establish your brand identity. By following these steps, you can ensure that your labels are not only functional but also reflect the quality and craftsmanship of your jewelry. Experiment with different materials and designs to find what best represents your style. Packaging Companies In Canada offer a wide range of solutions for businesses looking to enhance their product presentation.